Securing CouchDB with Keycloak Behind Nginx Reverse Proxy – Part 1
In the coming weeks, I will face the task of enriching the current CouchDB deployment in one of the projects using it for metadata storage with features like SSO integration and fine-grained access management. As the SSO service of the project uses Keycloak under the hood and I am relatively new to both Keycloak and CouchDB, I decided to make some proof of concept beforehand and share the results within this blog post series.
With the experiments done here, I aim to achieve three goals. First, securing access to the CouchDB instance using JWT authentication handler and Nginx as a reverse proxy. Second, providing a CLI utility that allows authenticating seamlessly using the OAuth2 authorization code flow with PKCE. And third, implementing the required solutions to maintain the authentication and authorization process for applications created and deployed with CouchApps.
Each of these goals will receive a dedicated blog post to address the given requirements and to create a proof of concept that can be further extended for production deployment.
All the blog posts from this short series can be found below in the following table of contents:
Part 1: Single Sign-On for CouchDB: Integrating Keycloak and Nginx
Part 2: Command-Line Access to CouchDB: Authorization Code Flow with PKCE (in progress)
Part 3: Securing CouchApps: Implementing Keycloak Authentication and Authorization (in progress)
Introduction
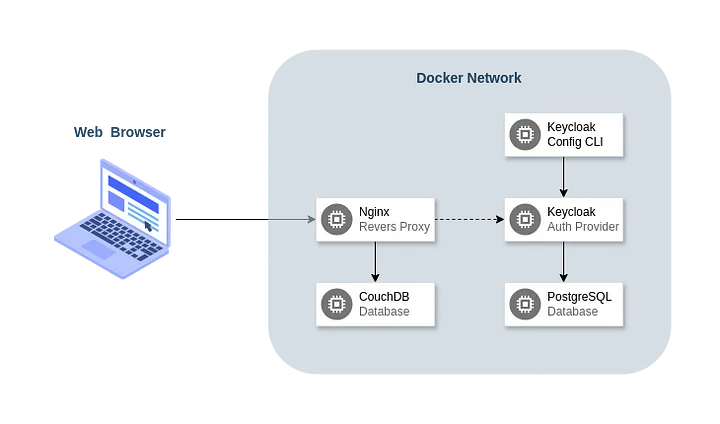
To simulate the production environment where the solutions should be implemented at the end of the process, I decided to use Docker and Bitnami containers as they are quick and easy to set up. The overall architecture will be composed of the following services:
- Keycloak — an open-source identity and access management solution that provides user management and fine-grained authorization features.
- Keycloak Config CLI — a utility to ensure the desired configuration state for a realm based on a JSON/YAML file.
- PostgreSQL — a powerful, open-source object-relational database system that will be used as Keycloak’s data storage.
- CouchDB — a document-oriented, open-source database, access to which we will secure using the OpenID Connect protocol offered by Keycloak.
- Nginx — a web server that can also be used as a reverse proxy and load balancer. Technically, we will use the OpenResty distribution, which comes with a Lua just-in-time compiler, but I will often refer to it as Nginx either way.
The following diagram presents a visualization of the interactions between the parties involved in the whole process.
Setting Up the Environment
Skipping further discussion, let’s dive straight into the implementation of the docker-compose file. Within this paragraph, we will implement and explain each service one by one.
Starting with Keycloak, we can write the following YAML:
1
2
3
4
5
6
7
8
9
10
11
12
13
14
15
16
17
18
19
20
21
22
23
24
version: "3.9"

services:
  keycloak:
    image: "bitnami/keycloak:24.0.3"
    environment:
      KEYCLOAK_HTTP_PORT: "8080"
      KEYCLOAK_CREATE_ADMIN_USER: "true"
      KEYCLOAK_ADMIN: "admin"
      KEYCLOAK_PROXY: "edge"
      KEYCLOAK_ADMIN_PASSWORD: "admin"
      KEYCLOAK_DATABASE_HOST: "postgres"
      KEYCLOAK_DATABASE_USER: "postgres"
      KEYCLOAK_DATABASE_PASSWORD: "postgres"
      KEYCLOAK_DATABASE_NAME: "postgres"
      KEYCLOAK_DATABASE_PORT: "5432"
    depends_on:
      - "postgres"
    networks:
      - "cks-network"

networks:
  cks-network:
    driver: "bridge"
As mentioned previously, it is based on the one of Bitnami’s containers. Details about environment variables available to be set can be found on Bitnami’s GitHub. Here, we set up the default admin account and database credentials. Additionally, we set the proxy option to “edge” which basically means that communication with Keycloak will happen over HTTP and not over HTTPS protocol. This is acceptable as the Nginx reverse proxy will handle SSL for us.
This container depends on the PostgreSQL container, as Keycloak will use it as data storage, and belongs to the cks-network, the same as any other services we will add next.
For the next container, we will have the Keycloak Config CLI.
1
2
3
4
5
6
7
8
9
10
11
12
13
14
services:
  keycloak-config-cli:
    image: "bitnami/keycloak-config-cli:5.12.0"
    environment:
      KEYCLOAK_URL: "http://keycloak:8080"
      KEYCLOAK_USER: "admin"
      KEYCLOAK_PASSWORD: "admin"
      IMPORT_FILES_LOCATIONS: "/config/*"
    depends_on:
      - "keycloak"
    volumes:
      - "./keycloak/master.yaml:/config/master.yaml"
    networks:
      - "cks-network"
Again, we have Bitnami’s container described in detail on GitHub. What we need to set up here are basically environment variables related to Keycloak access and the config directory. We also specify that this container belongs to our default network and depends on the Keycloak container. Furthermore, we attach a volume here where the YAML file with realm configuration will be placed in the latter sections of this blog post.
Furthermore, we will have PostgreSQL, which in this case is strongly related to Keycloak as well.
1
2
3
4
5
6
7
8
9
10
11
12
13
14
15
services:
  postgres:
    image: "bitnami/postgresql:15.6.0"
    environment:
      POSTGRESQL_USERNAME: "postgres"
      POSTGRESQL_PASSWORD: "postgres"
      POSTGRESQL_DATABASE: "postgres"
    volumes:
      - "cks-postgres-data:/bitnami/postgresql"
    networks:
      - "cks-network"

volumes:
  cks-postgres-data:
    driver: "local"
Quite simple. Once more, it’s Bitnami’s container with default database access configuration stored in environment volumes. Additionally, we also have a volume attached to prevent data loss in case of container restart. Same network as previously.
As we’ve configured the first database, we can configure another one, so now it’s time for CouchDB.
1
2
3
4
5
6
7
8
9
10
11
12
13
14
15
16
17
18
services:
  couchdb:
    image: "bitnami/couchdb:3.3.3"
    environment:
      COUCHDB_USER: "admin"
      COUCHDB_PASSWORD: "admin"
      COUCHDB_SECRET: "top-secret"
      COUCHDB_BIND_ADDRESS: "0.0.0.0"
      COUCHDB_PORT_NUMBER: "5984"
    volumes:
      - "cks-couchdb-data:/bitnami/couchdb"
      - "./couchdb/10-config.ini:/opt/bitnami/couchdb/etc/local.d/10-config.ini"
    networks:
      - "cks-network"

volumes:
  cks-postgres-data:
    driver: "local"
One last time, we use Bitnami’s container version, the description of which can be found here. In environment variables, we have default admin credentials, secret used for cookie encryption, and startup config for CouchDB. Here, we have a persistent volume for data as well, and additionally, we also have a volume with a config file which will be described in detail later.
Last, but not least, there will be Nginx — our reverse proxy.
1
2
3
4
5
6
7
8
9
10
11
12
13
14
15
16
17
version: "3.9"

services:
  nginx:
    build: "./nginx"
    ports:
      - "80:80"
      - "443:443"
    volumes:
      - "./nginx/certs:/opt/bitnami/openresty/nginx/conf/bitnami/certs:ro"
      - "./nginx/server_blocks:/opt/bitnami/openresty/nginx/conf/server_blocks:ro"
      - "./nginx/lua:/opt/bitnami/openresty/lua:ro"
    depends_on:
      - "couchdb"
      - "keycloak"
    networks:
      - "cks-network"
This service will also use the Bitnami container, but we will add a few packages there. Don’t worry about it now as we will cover it in a separate section. Nginx is also the single service that exposes ports so we can communicate with it. It depends on both the CouchDB and Keycloak services and belongs to the same network as all other containers. In volumes, we have separate directories attached for SSL certificates, server block definitions, and Lua scripts.
Now that the overall infrastructure is ready, we can focus on configuring individual services.
Configuring Keycloak
Theoretically, we could configure the entire Keycloak realm manually by clicking appropriate options in the GUI. However, I believe that posting all the screenshots here would not be practical as there would be a lot of them, and they may change over time. That’s why I decided to incorporate the Keycloak Config CLI. Thanks to this utility, we can store the configuration in a convenient YAML file that will be simple to present and describe.
In our application, we will have only one realm called “master”, and the initial setup looks as follows:
1
2
3
realm: "master"
attributes:
  frontendUrl: "https://auth.oblivio.localhost"
This is not very interesting but defines the realm name and the URL of the frontend application. We will later define an appropriate server block in Nginx to proxy this particular subdomain to the Keycloak container.
If you are wondering about the part with “oblivio”, it is nothing special. I just decided to name this application somehow and chose this particular word. It means “forgetfulness” or “loss of remembrance.”
The next part of our configuration is groups definitions. We will have one main group for CouchDB users with two subgroups for admins and regular users. Later, using attribute mapper, we will add appropriate roles for the access token so CouchDB can use it to properly identify user roles.
1
2
3
4
5
6
7
8
9
10
11
12
13
14
groups:
  - name: "couchdb"
    path: "/couchdb"
    subGroups:
      - name: "admins"
        path: "/couchdb/admins"
        attributes:
          _couchdb.roles:
            - "_admin"
      - name: "users"
        path: "/couchdb/users"
        attributes:
          _couchdb.roles:
            - "_user"
The attribute mentioned is called _couchdb.roles, and it is the default property name used by CouchDB to infer user roles from the access token, but it can also be changed to another value if needed.
Later, we have clients configuration. For now, we have only one client which will be used by Nginx to authorize access to CouchDB, but in the next part of the series, we will add one more.
1
2
3
4
5
6
7
8
9
10
11
12
13
14
clients:
  - clientId: "couchdb-proxy"
    name: "CouchDB Proxy"
    publicClient: "false"
    clientAuthenticatorType: "client-secret"
    secret: "32scbZbgGNSaVOAAuZHgYeTjdQrkfwTh"
    redirectUris:
      - "https://couchdb.oblivio.localhost/*"
    standardFlowEnabled: "true"
    directAccessGrantsEnabled: "false"
    optionalClientScopes:
      - "couchdb"
      - "profile"
      - "email"
This client type is confidential and has a secret set up so Nginx would be able to store it securely. The CouchDB Proxy client allows for only the authorization code flow known for OAuth2 and permits only redirection URIs to the specified subdomain where the CouchDB instance will be available.
Additionally, it comes with three optional client scopes. Email and profile scopes are shipped with the default Keycloak config, but the scope for CouchDB is custom, and we can define it with the following YAML.
1
2
3
4
5
6
7
8
9
10
11
12
13
14
15
16
17
clientScopes:
  - name: "couchdb"
    description: "CouchDB"
    protocol: "openid-connect"
    protocolMappers:
      - name: "couchdb-roles"
        protocol: "openid-connect"
        protocolMapper: "oidc-usermodel-attribute-mapper"
        config:
          user.attribute: "_couchdb.roles"
          claim.name: "_couchdb\\.roles"
          jsonType.label: "String"
          userinfo.token.claim: "true"
          access.token.claim: "true"
          id.token.claim: "false"
          multivalued: "true"
          aggregate.attrs: "true"
This scope contains a protocol mapper for OpenID Connect which defines to which property the attribute we added to the group will be mapped. Notice that the claim name contains two backslashes as otherwise the dot would mean that “roles” should be an object inside of the “_couchdb” property, which is not what we want. Backslashes prevent this behavior and store the whole string as one property name. As the user may have more than one role, we set this claim as a multivalued and aggregated attribute. At the end, we define in which tokens it should be present.
The last part of the configuration is the RSA key configuration that will be later used to sign generated tokens.
1
2
3
4
5
6
7
8
9
10
11
12
components:
  org.keycloak.keys.KeyProvider:
    - name: "rsa"
      providerId: "rsa"
      config:
        active: ["true"]
        enabled: ["true"]
        priority: ["1000"]
        algorithm: ["RS256"]
        kid: ["xvAsHaF2w0M1y9GG6bmFannhp9aFLKvHQRaAAb8gUYc"]
        privateKey: ["-----BEGIN PRIVATE KEY-----\nMIIEvAIBADANBgkqhkiG9w0BAQEFAASCBKYwggSiAgEAAoIBAQDM98i2/CFRiFYNlUtJ5ppUNyZUOa2+7SMnya3tzfrPOEVma6AJAMJ9YR2CL6SIkyz6q5RqnhQSXTzvPO9OasKuXLWtxpjVZRawCXoCciyaJTLe8qcmb6SOCOsjRSiGB1PaivJ/7NbCDiP6r8BxX4TXsYfdGW2EDBot+klxG6a+FObCA7KJ1bp/yPbgpP+mNyj7P8lG22E3USRjE3g8ag/J8b3UK+Azu1yBmdYAEPG1qz8q46tgF9qJiDo7QNDroRDLxoclypMsHJ3AIbJh5lquAl4uTALYMLI2foKJqXlc+JZ9tdTzxYg04R7SKuAcizdjZ2VccJNpGySGs5i8XguTAgMBAAECggEAOjpiQOmbpYfvumghPVtPmIEaWG8SVt0TUahPyvDrQZcg0BnfGu+mUOwX7/YM7eexrXy06x0BYr4uI2DSMxrNN6+KxVVX8beIHHZ0vOEmnpvWudOBfL/WpasO8bQh8QF/5uP2RDVKRVKzEfJ/3zVdjdEXYc5peEvf3BPwbTuHwRO4F69hgCZi8saBNXBinnOwQ8MSsUeA4RsC7+WcxygufBhNqjkqrYbpznkaZI5nrVdw7mb5E9KcOxbg0BUWnz141gPuUpu2O0iFiiAZoSlDtIwKCtdcvc2UJMYbXK9ORsIscRwP6b8T6O3Uhq1zkXQyjtLWbrfcpoNGGJ2udRFDEQKBgQD/UUVugyEOP98+S5e/2d2W+rk96HX7CKMQwj/ZA9NETugGAiD7fuUpbu3NzrAN7tsTXGOyArBEfdcXwjhvg52WhO9eOB/mcaiXEWVTk89ZrbcvZknDljKWM5zXOMvVZXAK6ci53jfVn5RLA2RIjK5mds1pLXIWgDHPrXFI7Nkb/wKBgQDNhA4/aaAyko8NiAWvk0hYZYQCFSH3YBl28lt90zzDjoZaQd/s8mpaRO4TY+KwFGBEznlFa28e1g0YzpZh13+V1ss4WT9NV/3tux2rblJWa2kmYbA/PeQDLHVfC/fq46T90uUW0wRIkc+nVTKG94Oo+tPUERjlmSJbzsjUDJLgbQKBgCXW9LRhSNfkzYBdEbuEXZwPwr6TIlE3QXutXmsabwhTrX2eeSbs8qfGYgY7mMon2V4wNjJexaMRB3zk8xpL5mI1h4huRwQPWk4xbNQLNxLydRDYVxxeuVabhaY8K7GP3CAx7+bkMWA+y2qmsQkzmHFlMCJjcuI0060U5pJJUBAfAoGALI30iMrdcBlV6hkTIn1Lsd5QQCNUucybuK3SJ/Ujt0Gu3uJpKXVkmS1Yb9u3yXShaklZATPJY2YEcNxYvd16S4HFjPHMR3hMFL38MK46K4IdybRkAVHpnMaGq5Rsqv+vRVfzUn9s7k6uNhjCW4BNitTWF6OdQilwyXaLE22magECgYAx1tGChvGQM3rYyJDA22ZNU4b+olc2bBJ0v45EX0unjGseuzPTKQRaGp8LqgByXcMuZqCCidsvlfrrz16hGHnsqPQFSV4ZL4D1pOKshmWhscLtF10FeC8z0QoJCNFaPuRkMCXyx+X+XjGsdfKRO/84z/7FfCI0t2QvvGWSnRpKUw==\n-----END PRIVATE KEY-----n"]
        certificate: ["-----BEGIN CERTIFICATE-----\nMIIDhzCCAm+gAwIBAgIUVv9/pUd6omHb9BhGmfZb/jVPmz4wDQYJKoZIhvcNAQELBQAwUzELMAkGA1UEBhMCUEwxEzARBgNVBAgMClNvbWUtU3RhdGUxHTAbBgNVBAcMFEdyZWF0ZXIgUG9sYW5kV2Fyc2F3MRAwDgYDVQQKDAdPYmxpdmlvMB4XDTI0MDUxNzE0NTkxNloXDTI2MDUxNzE0NTkxNlowUzELMAkGA1UEBhMCUEwxEzARBgNVBAgMClNvbWUtU3RhdGUxHTAbBgNVBAcMFEdyZWF0ZXIgUG9sYW5kV2Fyc2F3MRAwDgYDVQQKDAdPYmxpdmlvMIIBIjANBgkqhkiG9w0BAQEFAAOCAQ8AMIIBCgKCAQEAzPfItvwhUYhWDZVLSeaaVDcmVDmtvu0jJ8mt7c36zzhFZmugCQDCfWEdgi+kiJMs+quUap4UEl087zzvTmrCrly1rcaY1WUWsAl6AnIsmiUy3vKnJm+kjgjrI0UohgdT2oryf+zWwg4j+q/AcV+E17GH3RlthAwaLfpJcRumvhTmwgOyidW6f8j24KT/pjco+z/JRtthN1EkYxN4PGoPyfG91CvgM7tcgZnWABDxtas/KuOrYBfaiYg6O0DQ66EQy8aHJcqTLBydwCGyYeZargJeLkwC2DCyNn6Cial5XPiWfbXU88WINOEe0irgHIs3Y2dlXHCTaRskhrOYvF4LkwIDAQABo1MwUTAdBgNVHQ4EFgQU9poNBVHTqAYUxc5c4naQhd2kOOswHwYDVR0jBBgwFoAU9poNBVHTqAYUxc5c4naQhd2kOOswDwYDVR0TAQH/BAUwAwEB/zANBgkqhkiG9w0BAQsFAAOCAQEANcDxRDTyi1VLSjA4DFm/s0aSYSRtiGJoYxCSjxW+IthzMDmV6kuI7c/n+O5gIOTBQ2gCF9evbVbFcF/nYq4zKo5WvCfrZ8Hekvjdm5TOSKMRGWaoydOsVsRPlvNN2q+iVFzmymPixWRblLzbYG1T0lRn6tLn2BKH0qkNUUg68ljA8qYgvulYo5FzSLB1KgZRjDyyDS5+IT/vr/M2H/4h1eCPdD2JROfxf4+3OKBXg5N2Y6DJ/mwNqe+8WGOLmaPDV6GaBVR8BcryYBohrEwYwouhqvNYsk5c1wLBS+k4T1PHC53I/9oGrdhX9jDQiHvQ2CzTp5e9rscbVr71nv03ug==\n-----END CERTIFICATE-----\n"]
I understand that at this point, you may feel uneasy about hard-coding the private key and secret in the earlier part. Don’t worry I feel the same way, but as this is mostly a proof of concept, I decided that this would be simpler at this point, so we will stick to this for now.
And that’s it, the whole configuration for the Keycloak realm. Later, we will also add a user to test it, but for now, we can move on to the CouchDB configuration.
Preparing CouchDB for SSO Integration
Since the CouchDB configuration is shorter than the previous one, I will simply put the entire config below and briefly describe it.
1
2
3
4
5
6
7
8
9
10
11
12
13
[couchdb]
uuid = 5f1a34cf3b35423690c2474a7527e2ff

[chttpd]
authentication_handlers = {chttpd_auth, jwt_authentication_handler}, {chttpd_auth, cookie_authentication_handler}, {chttpd_auth, default_authentication_handler}
require_valid_user = false

[jwt_auth]
required_claims = exp, iat
roles_claim_path = _couchdb\.roles

[jwt_keys]
rsa:xvAsHaF2w0M1y9GG6bmFannhp9aFLKvHQRaAAb8gUYc = -----BEGIN PUBLIC KEY-----\nMIIBIjANBgkqhkiG9w0BAQEFAAOCAQ8AMIIBCgKCAQEAzPfItvwhUYhWDZVLSeaaVDcmVDmtvu0jJ8mt7c36zzhFZmugCQDCfWEdgi+kiJMs+quUap4UEl087zzvTmrCrly1rcaY1WUWsAl6AnIsmiUy3vKnJm+kjgjrI0UohgdT2oryf+zWwg4j+q/AcV+E17GH3RlthAwaLfpJcRumvhTmwgOyidW6f8j24KT/pjco+z/JRtthN1EkYxN4PGoPyfG91CvgM7tcgZnWABDxtas/KuOrYBfaiYg6O0DQ66EQy8aHJcqTLBydwCGyYeZargJeLkwC2DCyNn6Cial5XPiWfbXU88WINOEe0irgHIs3Y2dlXHCTaRskhrOYvF4LkwIDAQAB\n-----END PUBLIC KEY-----\n
Moving from top to bottom, we have the UUID, which serves as the unique identifier for the instance. Later, we have a list of possible authentication handlers where we add the JWT authentication handler as it is not enabled by default. Because our users are no longer stored in the CouchDB instance, we also have to disable user validation.
Further, we have the JWT config where we set what claims are required and the path to the claim where the user’s roles are stored. Notice that here there is also a backslash which serves a similar purpose to the two backslashes described in the Keycloak configuration section. Lastly, we have the public key derived from the private key used to sign the access token so CouchDB could know that it can trust tokens provided from Keycloak.
Nginx as a Reverse Proxy
We are almost there, but before we are ready to test this solution, we have to configure one last thing — the reverse proxy. As this part will be relatively long, it will be split into three subsections for building the Docker image, configuring Nginx’s server blocks, and writing Lua scripts for authentication.
Building the Docker Image
The Bitnami image for OpenResty is good as is, but it lacks a few Lua packages that we will need for integration with Keycloak.
1
2
3
4
5
FROM bitnami/openresty:1.25.3-1

RUN opm get zmartzone/lua-resty-openidc
RUN opm get ledgetech/lua-resty-http
RUN opm get bungle/lua-resty-session=3.10
We are mostly interested in “zmartzone/lua-resty-openidc” as it implements the OpenID Connect Relying Party functionality, which we will benefit from for authorization with Keycloak. The following two packages are dependencies needed for the first one. As of the time of writing this post, the created solutions do not work with the “bungle/lua-resty-session” version newer than 3.10, so it is fixed to this version here.
Configuring Server Blocks
Now we can start configuring server blocks for our Nginx container. We will start simple with the following block.
1
2
3
4
5
6
7
8
server {
    server_name _;

    listen 80;
    listen [::]:80;

    return 301 https://$host$request_uri;
}
This part listens on port 80 for all domains and subdomains and redirects any request sent over HTTP to the secure version of the protocol. We will later generate self-signed certificates so we can use HTTPS on localhost.
Next, we have a server block for the Keycloak instance.
1
2
3
4
5
6
7
8
9
10
11
12
13
14
15
16
17
18
19
server {
    server_name auth.oblivio.localhost;

    listen 443 ssl;
    listen [::]:443 ssl;

    http2 on;

    ssl_certificate bitnami/certs/server.crt;
    ssl_certificate_key bitnami/certs/server.key;

    location / {
        proxy_pass http://keycloak:8080;
        proxy_set_header Host $host;
        proxy_set_header X-Real-IP $remote_addr;
        proxy_set_header X-Forwarded-For $proxy_add_x_forwarded_for;
        proxy_set_header X-Forwarded-Proto $scheme;
    }
}
This part listens on port 443 for both IPv4 and IPv6 and handles requests sent to the subdomain “auth.oblivio.localhost”, as you may remember we set this address earlier as the frontend URL of Keycloak. There are also paths to SSL certificate and private key. We will generate them at the end of this section. And at the end, we handle all locations for this server to pass the request to the Keycloak container.
The last block here will be for the CouchDB.
1
2
3
4
5
6
7
8
9
10
11
12
13
14
15
16
17
18
19
20
21
22
server {
    server_name couchdb.oblivio.localhost;

    listen 443 ssl;
    listen [::]:443 ssl;

    resolver 127.0.0.11 valid=10s;

    http2 on;

    ssl_certificate bitnami/certs/server.crt;
    ssl_certificate_key bitnami/certs/server.key;

    location / {
        access_by_lua_file /opt/bitnami/openresty/lua/access.lua;
        proxy_pass http://couchdb:5984;
        proxy_set_header Host $host;
        proxy_set_header X-Real-IP $remote_addr;
        proxy_set_header X-Forwarded-For $proxy_add_x_forwarded_for;
        proxy_set_header X-Forwarded-Proto $scheme;
    }
}
Once more, we have a similar setup. We configure the subdomain to handle, “couchdb.oblivio.localhost” in this case, ports to listen, and paths to SSL certificate and private key.
What’s different here is the “resolver” directive. It points to the special Docker DNS resolver, and it is needed because of subrequests that “zmartzone/lua-resty-openidc” will send for authentication purposes. Additionally, there is the “access_by_lua_file” directive, which points to the Lua script where we will create authentication logic in the next section.
Before moving on to the Lua part, let’s generate self-signed certificates using the “mkcert” utility. It’s relatively simple. This tool will also install this certificate in appropriate system directories so our browser can trust them.
1
mkcert -cert-file nginx/certs/server.crt -key-file nginx/certs/server.key oblivio.localhost \*.oblivio.localhost
We only have to define the path where the certificate and private key will be stored, as well as which domains it will protect. Quite simple, isn’t it?
Lua Script for Authentication
Here we will start by defining options for “zmartzone/lua-resty-openidc” that will match our specific use case.
1
2
3
4
5
6
7
8
9
10
11
12
13
14
15
16
17
18
19
20
21
22
23
24
25
local opts = {
    redirect_uri = "/callback",
    discovery = {
        issuer = "https://auth.oblivio.localhost/realms/master",
        authorization_endpoint = "https://auth.oblivio.localhost/realms/master/protocol/openid-connect/auth",
        end_session_endpoint = "https://auth.oblivio.localhost/realms/master/protocol/openid-connect/logout",
        token_endpoint = "http://keycloak:8080/realms/master/protocol/openid-connect/token",
        jwks_uri = "http://keycloak:8080/realms/master/protocol/openid-connect/certs",
        userinfo_endpoint = "http://keycloak:8080/realms/master/protocol/openid-connect/userinfo",
        revocation_endpoint = "http://keycloak:8080/realms/master/protocol/openid-connect/revoke",
        introspection_endpoint = "http://keycloak:8080/realms/master/protocol/openid-connect/token/introspect"
    },
    client_id = "couchdb-proxy",
    client_secret = "32scbZbgGNSaVOAAuZHgYeTjdQrkfwTh",
    scope = "openid couchdb",
    renew_access_token_on_expiry = true,
    access_token_expires_in = 60,
    accept_none_alg = false,
    accept_unsupported_alg = false,
    session_contents = {
        id_token = true,
        access_token = true,
        refresh_token = true
    }
}
There is quite a lot of them, but going up to bottom, you can see that first we defined the callback where the user should be redirected after successful authentication. In our case, it is a relative path to the current subdomain, which is “auth.oblivio.localhost”. Next, we have the URL endpoints for the OpenID Connect provider. Here you may notice that some of them are pointing directly to the container, while others use the whole subdomain. This depends on who will be actually using the given URL. If it is meant to be used by the browser, then we will go with the subdomain. If it is meant to be used by the library itself, we use the direct container address.
Later we have to choose which client we want to use and provide its secret, as well as the scopes that we want to use. We have the “couchdb” scope there, which will add the CouchDB roles based on the group configured in Keycloak to the access token. Further, we have token configuration like expiration time, whether it should be renewed when expired, and if unsupported algorithms are allowed.
At the end, we define session content, which means what information will be stored in the session. In our case, we want to have the ID Token, access token, and refresh token.
When we have options prepared, we can invoke the authentication function from “zmartzone/lua-resty-openidc” and benefit from it doing all the job for us.
1
2
3
4
5
6
7
8
9
10
11
local res, err = require("resty.openidc").authenticate(opts)

if err then
    ngx.status = 500
    ngx.say(err)
    ngx.exit(ngx.HTTP_INTERNAL_SERVER_ERROR)
end

if res then
    ngx.req.set_header("Authorization", "Bearer " .. res.access_token)
end
It is quite simple. If the method invocation ends with an error, we also exit the whole process with an internal server error. Otherwise, if we have a successful response from the authentication provider, we add the authorization header of “Bearer” type with the access token returned by Keycloak to the request so CouchDB could use it to verify user identity.
Running and Testing the Setup
Whew — the configuration part is already behind us! Now we can start testing the solutions proposed. We can initiate the entire application with the following command:
1
docker compose up -d
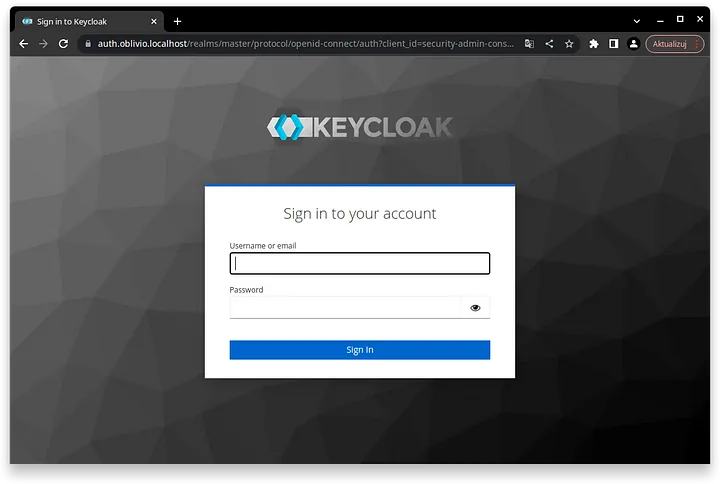
Hopefully, if everything went well, our application should be already up and running. You can confirm it by navigating to the “https://auth.oblivio.localhost” address in your web browser. You should see the default Keycloak authentication page there.
As we are here, we can log in as the default administrator. We set its credentials in Docker environment variables, so now it is time to make use of them.
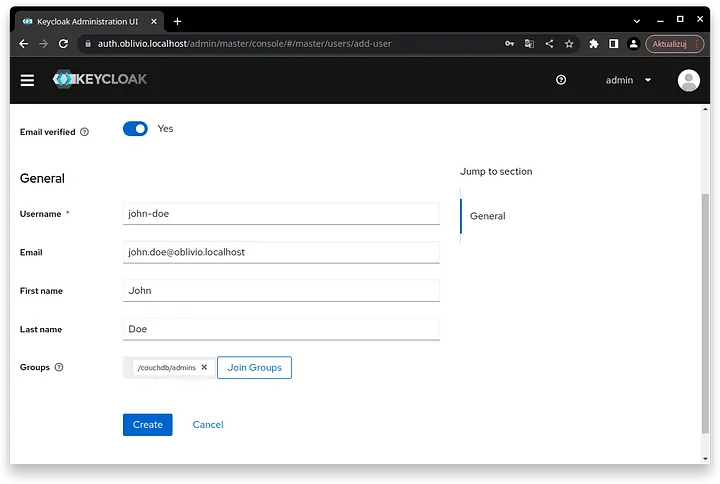
If you signed in successfully, you can go through all pages to check whether all options from the YAML file we prepared are present as expected here. What’s more, I would like you to also create a new user. We will try to sign in to CouchDB with its credentials.
To do this, go to the “Users” tab and click the “Add user” button. Here, click the “Email verified” toggle and set the user details according to your preference. Then, join this user to the “/couchdb/admins” group by clicking the “Join Groups” button and checking the correct group.
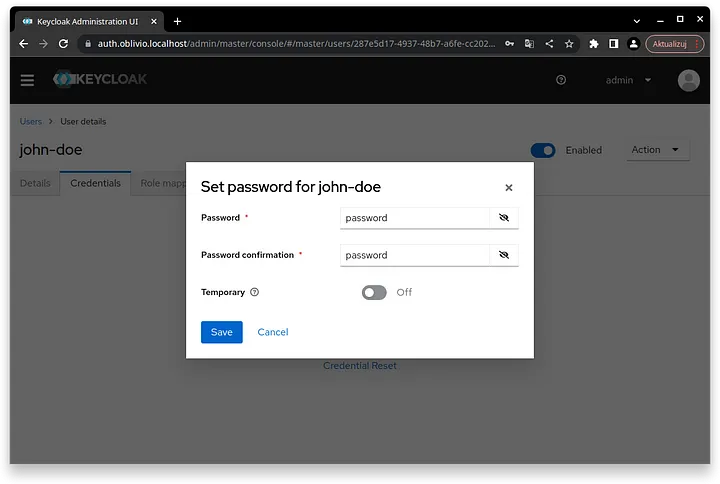
Click create and go to the “Credentials” tab. Then press the “Set password” button and create a password of your choice. For simplicity, disable the “Temporary” option.
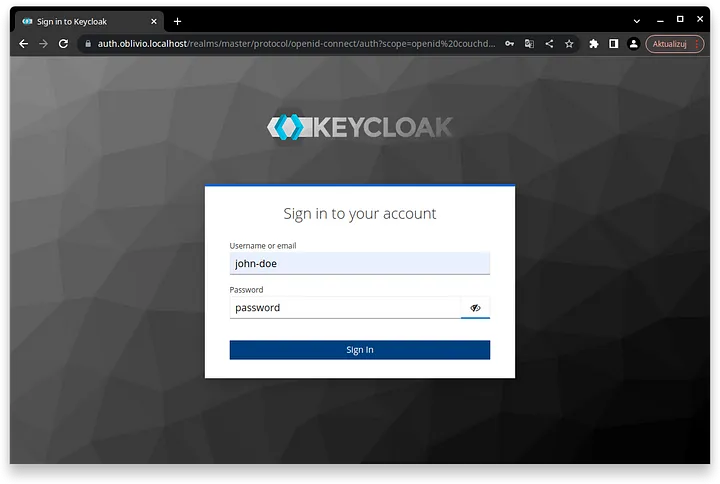
Perfect! You just created a new user. Now open a private browser tab and go to “https://couchdb.oblivio.localhost” to check if you will be able to log in with its credentials to CouchDB. As you are not authenticated yet, you should be redirected to “https://auth.oblivio.localhost” where you have to provide the credentials you set previously.
Click the “Sign In” button, and you will be redirected to the CouchDB welcome page. There is only JSON with some basic information about the CouchDB instance, but from this place, you can go to “/_session” path where you can see information about the authenticated user or to “/_utils” to access Fauxton, which is a GUI for CouchDB management. From “/_session”, you should receive JSON similar to the one below:
1
2
3
4
5
6
7
8
9
10
11
{
  "ok":true,
  "userCtx":{
    "name":"287e5d17-4937-48b7-a6fe-cc2029c1cf68",
    "roles":["_admin"]
  },
  "info":{
    "authentication_handlers":["proxy","jwt","cookie","default"],
    "authenticated":"jwt"
  }
}
Here you can find out that you are authenticated as the user with the given UUID. This is a unique identifier assigned to the user by Keycloak. There is also information about user roles. If you were to join another group we created in Keycloak, you would see the “_user” role here. At the end, there is information about available authentication handlers and which one was used to authenticate the current user.
Summary
Yeah! We have completed the first part of the series. With this blog post, we have discovered that by using Keycloak, Nginx, Lua, and a bunch of configuration files, we are able to access the CouchDB instance with our own Single Sign-On managed by Keycloak. It was quite a long process, but in the end, we achieved what we set out to accomplish in this part. In the next parts, we will aim to extend this solution to also be able to access the CouchDB instance from the shell with our custom-made curl wrapper and to ensure that this solution is able to work with CouchApps as well.
If you need all the code from this article in one place, you can find it in my GitHub repository.
At this point, thank you for reading this article. I would love to hear your thoughts about this solution. Whether you work actively with CouchDB or Keycloak, can you spot weaknesses in this solution? Or maybe you would improve something? I would love to hear about it in the comments.
Don’t forget to check out my other articles for more tips and insights and other parts of this series when they are created. Happy hacking!

