Securing CouchDB with Keycloak Behind Nginx Reverse Proxy – Part 2

In the coming weeks, I will face the task of enriching the current CouchDB deployment in one of the projects using it for metadata storage with features like SSO integration and fine-grained access management. As the SSO service of the project uses Keycloak under the hood and I am relatively new to both Keycloak and CouchDB, I decided to make some proof of concept beforehand and share the results within this blog post series.
With the experiments done here, I aim to achieve three goals. First, securing access to the CouchDB instance using JWT authentication handler and Nginx as a reverse proxy. Second, providing a CLI utility that allows authenticating seamlessly using the OAuth2 authorization code flow with PKCE. And third, implementing the required solutions to maintain the authentication and authorization process for applications created and deployed with CouchApps.
Each of these goals will receive a dedicated blog post to address the given requirements and to create a proof of concept that can be further extended for production deployment.
All the blog posts from this short series can be found below in the following table of contents:
Part 1: Single Sign-On for CouchDB: Integrating Keycloak and Nginx
Part 2: Command-Line Access to CouchDB: Authorization Code Flow with PKCE
Part 3: Securing CouchApps: Implementing Keycloak Authentication and Authorization (in progress)
Introduction
In the last article of the series, we created the base development setup for our proof of concept. In this part, we will continue the subject of securing CouchDB with Keycloak. Instead of interacting with CouchDB via a browser, we will develop a CLI utility that will handle the authorization process for us and attach the authorization header to curl requests.
To achieve this goal, I will follow the approach used by the Google Cloud CLI. Approximately, the flow of the application we will create can be presented as follows:
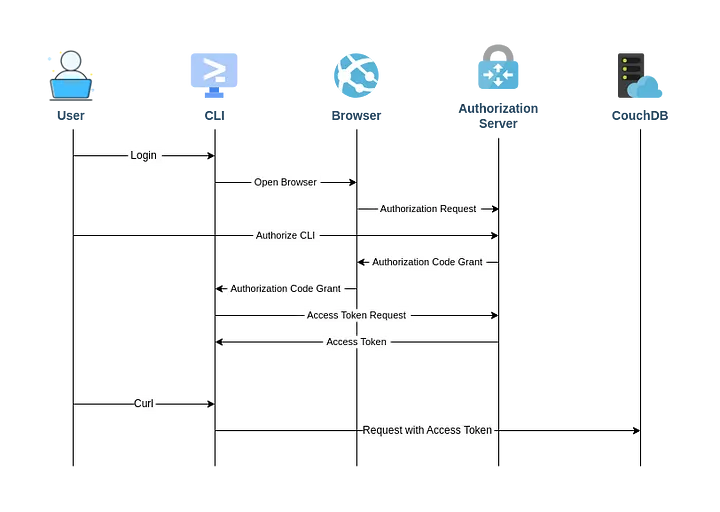
As you can see, after initializing the authorization flow from the CLI, the user is redirected to the browser where they can complete the flow in the way we know from the previous part. However, instead of being redirected to the application, the request with the authorization code will be redirected to the listening server started by our application. The application will then exchange the code for an access token and store it for future use.
Adding Public Client to Keycloak
As the Nginx proxy can securely store the client secret, in the last episode of the series, we created a confidential client in Keycloak. This time, however, the source code of our application will be directly available to the end users. Using the same method would be meaningless as the secret could be easily extracted. For this reason, our new application will use a public client.
With the setup we made, adding a new client is just a matter of editing the Keycloak configuration file as follows:
1
2
3
4
5
6
7
8
9
10
11
12
clients:
  - clientId: "couchdb-cli"
    name: "CouchDB CLI"
    redirectUris:
      - "http://localhost:8080"
    standardFlowEnabled: "true"
    directAccessGrantsEnabled: "false"
    publicClient: "true"
    optionalClientScopes:
      - "couchdb"
      - "profile"
      - "email"
As you can see, we set the client ID and name for the new public client. We have the optional client scopes and authorization flows configured in the same way as previously. What differs here is the redirect URI. Previously, we had the address of the CouchDB instance, but this time, since we are dealing with the CLI, we will redirect requests to a localhost server started by our application.
Crafting CLI Utility
Simply put, our utility will be a collection of shell scripts that together provide the required functionalities. Inside the root directory of our application, we will have two directories: bin for the executable file and lib for all other scripts. Main commands will be stored as scripts in the lib directory, while sub-commands will be organized into sub-directories to maintain order. The file structure for this project will look as follows:
1
2
3
4
5
6
7
8
9
10
11
cli/
├── bin/
│   └── cdb
└── lib/
    ├── auth/
    │   ├── login.sh
    │   └── logout.sh
    ├── utils/
    │   └── oidc.sh
    ├── auth.sh
    └── curl.sh
I didn’t mentioned earlier, but our utility will be called cdb which is an abbreviated version of CouchDB name. We can start writing the code from the executtable file in bin directory.
1
2
3
4
5
6
7
8
9
10
11
12
13
14
15
16
17
18
19
20
21
22
23
24
25
26
27
28
29
30
31
32
33
34
35
36
37
38
39
40
41
42
43
44
#!/bin/bash

set -e

readonly ROOT_DIR="$(dirname "$0")/.."
readonly LIB_DIR="$ROOT_DIR/lib"

help() {
  cat << EOF | sed 's/^ \{4\}//'
    cdb: A command-line tool for interacting with CouchDB instances securely using OIDC authentication.

    Usage:
      cdb <command> [options]

    Commands:
      auth   Authorizes the CLI to access the CouchDB instance securely using OIDC authentication.
      curl   Wrapper around curl that securely communicates with the CouchDB instance using the obtained authentication token.
      help   Displays this help message.

    Options:
      --help, -h  Displays this help message.

    Examples:
      cdb auth login
      cdb curl -X GET http://localhost:5984/_all_dbs

    For more information on a specific command, type 'cdb <command> --help'.
EOF
}

main() {
  case $1 in
    auth) shift; source "$LIB_DIR/auth.sh";;
    curl) shift; source "$LIB_DIR/curl.sh";;
    help | --help | -h) help;;
    *)
      if [ -n "$1" ]; then echo -e "Unknown command: $1\n"; fi
      help
      exit 1
    ;;
  esac
}

main "$@"
The majority of this script is taken up by the help function. While it’s not crucial for the functioning of the CLI, it will be helpful for new users. Each command and sub-command will also have its own help function, but for clarity, I will omit them in the following parts. They can still be found in my GitHub repository.
Apart from the help function, there’s a more important main function that handles commands. For the auth and curl commands, the first argument is shifted from the arguments list, and the appropriate script is called. There’s also a case for the help command or option, and a fallback for invalid commands, which prints an error message about unknown commands and displays the help message.
Authorization Flow
When the entry point for our utility is ready, we can start with creating the authorization flow logic. Initially, it will be quite similar to the previous one.
1
2
3
4
5
6
7
8
9
10
11
12
13
14
15
16
17
18
19
20
21
#!/bin/bash

set -e -o pipefail
source "$LIB_DIR/utils/oidc.sh"

help() { ... }

main() {
  case $1 in
    login) shift; source "$LIB_DIR/auth/login.sh";;
    logout) shift; source "$LIB_DIR/auth/logout.sh";;
    help | --help | -h) help;;
    *)
      if [ -n "$1" ]; then echo -e "Unknown command: $1\n"; fi
      help
      exit 1
    ;;
  esac
}

main "$@"
It’s pretty much the same, except in this case, we have two sub-commands for login and logout. Also, at the very beginning of the script, we load helper functions to deal with OpenID Connect authentication and session ending from the oidc.sh file. The loaded functions are later used in the sub-commands. Speaking of which, we can now introduce the login logic.
1
2
3
4
5
6
7
8
9
10
11
12
13
14
15
16
17
18
19
20
21
22
23
24
25
26
27
28
29
30
31
32
33
34
35
36
37
38
39
40
41
42
#!/bin/bash

set -e -o pipefail

help() { ... }

login() {
  local oidc_config; oidc_config=$(get_oidc_config)
  local auth_endpoint; auth_endpoint=$(get_auth_endpoint "$oidc_config")
  local token_endpoint; token_endpoint=$(get_token_endpoint "$oidc_config")
  local state; state=$(get_state)
  local code_verifier; code_verifier=$(get_code_verifier)
  local code_challenge; code_challenge=$(get_code_challenge "$code_verifier")
  local code_challenge_method; code_challenge_method=$(get_code_challenge_method)
  local auth_url; auth_url=$(get_auth_url "$auth_endpoint" 'couchdb-cli' 'http://localhost:8080' 'openid+couchdb+profile+email' "$state" "$code_challenge" "$code_challenge_method")

  print_auth_url "$auth_url"

  local code; code=$(create_listener)
  local credentials; credentials=$(get_credentials "$token_endpoint" 'authorization_code' "$code" 'couchdb-cli' 'http://localhost:8080' "$code_verifier")

  if [ -z "$credentials" ]; then
    echo "Failed to authenticate. Please try again."
    exit 1
  fi

  local name; name=$(get_name "$credentials")
  local email; email=$(get_email "$credentials")

  save_credentials "$credentials" "${HOME}/.config/cdb"

  echo "Successfully authenticated as ${name} <${email}>."
}

main() {
  case $1 in
    help | --help | -h) help;;
    *) login "$1";;
  esac
}

main "$@"
Here, we have a lot of variables and function invocations. Going from top to bottom, we call the well-known configuration endpoint exposed by Keycloak. Then, we extract the authorization and token endpoints and prepare the authorization URL with standard query parameters known from OAuth2 and the Proof Key for Code Exchange (PKCE) challenge.
Next, we start a temporary server listening on port 8080 and ask the user to open the prepared link in the web browser. If the user authorizes our application successfully, Keycloak will redirect the request with the code grant to our server, where we intercept the code and exchange it for tokens. Finally, the tokens are stored in the ${HOME}/.config/cdb directory as a JSON file, so we can use them later.
In this part, we used a lot of helper functions, which can be implemented as follows.
1
2
3
4
5
6
7
8
9
10
11
12
13
14
15
16
17
18
19
20
21
22
23
24
25
26
27
28
29
30
31
32
33
34
35
36
37
38
39
40
41
42
43
44
45
46
47
48
49
50
51
52
53
54
55
56
57
58
59
60
61
62
63
64
65
66
67
68
69
70
71
72
73
74
75
76
77
78
79
80
81
82
83
84
85
86
87
88
89
90
91
92
93
94
95
96
get_oidc_config() {
  curl -s 'https://auth.oblivio.localhost/realms/master/.well-known/openid-configuration'
}

get_token_endpoint() {
  local oidc_config="$1"
  echo "$oidc_config" | jq -r '.token_endpoint'
}

get_auth_endpoint() {
  local oidc_config="$1"
  echo "$oidc_config" | jq -r '.authorization_endpoint'
}

get_state() {
  head -c 16 /dev/urandom | openssl enc -base64 | tr -dc 'a-zA-Z0-9'
}

get_code_verifier() {
  openssl rand -base64 60 | tr -d '\n' | tr '/+' '_-' | tr -d '='
}

get_code_challenge() {
  echo -n "$1" | openssl dgst -sha256 -binary | openssl enc -base64 | tr '/+' '_-' | tr -d '='
}

get_code_challenge_method() {
  echo 'S256'
}

get_auth_url() {
  local auth_endpoint="$1"
  local client_id="$2"
  local redirect_uri="$3"
  local scope="$4"
  local state="$5"
  local code_challenge="$6"
  local code_challenge_method="$7"

  echo "${auth_endpoint}?response_type=code&client_id=${client_id}&redirect_uri=${redirect_uri}&scope=${scope}&state=${state}&code_challenge=${code_challenge}&code_challenge_method=${code_challenge_method}"
}

print_auth_url() {
  echo "Open the following URL in your browser:"
  echo ""
  echo "$1"
  echo ""
  echo "Waiting for authorization..."
}

create_listener() {
  rm -f /tmp/oidc_listener
  mkfifo /tmp/oidc_listener
  trap "rm -f /tmp/oidc_listener" EXIT

  local success_response="HTTP/1.1 200 OK\r\nContent-Type: text/html\r\nContent-Length: 75\r\nConnection: close\r\n\r\n<p>Authentication was successful.</p><p>You can now close your browser.</p>"
  echo -en "$success_response" | nc -l -p 8080 > /tmp/oidc_listener &

  local code

  while IFS= read -r line; do
    if [[ "$line" == *"GET "*"code="* ]]; then
      code=$(echo "$line" | sed -n 's/^.*code=\([^&[:space:]]*\).*$/\1/p')
      break
    fi
  done < /tmp/oidc_listener

  echo "$code"
}

get_credentials() {
  local token_endpoint="$1"
  local grant_type="$2"
  local code="$3"
  local client_id="$4"
  local redirect_uri="$5"
  local code_verifier="$6"

  curl -s -X POST "${token_endpoint}" -d "grant_type=${grant_type}" -d "code=${code}" -d "client_id=${client_id}" -d "redirect_uri=${redirect_uri}" -d "code_verifier=${code_verifier}"
}

save_credentials() {
  local credentials="$1"
  local config_dir="$2"

  mkdir -p "${config_dir}"
  echo "${credentials}" > "${config_dir}/credentials.json"
}

get_name() {
  echo "$1" | cut -d "." -f2 | sed 's/$/====/' | fold -w 4 | sed '$ d' | tr -d '\n' | openssl enc -base64 -d -A | jq -r '.name'
}

get_email() {
  echo "$1" | cut -d "." -f2 | sed 's/$/====/' | fold -w 4 | sed '$ d' | tr -d '\n' | openssl enc -base64 -d -A | jq -r '.email'
}
I won’t go into details here as most of the functions are pretty simple shell commands generating values and sending requests as specified in the OAuth2 and PKCE RFCs or OpenID Connect protocol. However, what might be interesting is the part about creating a local server from a shell script. To do so, we create a FIFO named pipe, where we will direct messages from the server. Next, we define the success response, which is sent as a response to all requests coming to the server listening on port 8080 using the nc tool. Then, there is a loop that consumes messages from the queue and checks if the code grant is present in the query parameters. If this happens, the code is extracted and the loop is broken.
It may not be perfect, as it responds with a success message to any request and doesn’t handle errors well, but it is simple and sufficient for our proof of concept.
Remember to Log Out
Once the user is authorized and their credentials are stored, it is beneficial to provide them with the ability to log out. Implementing this feature won’t be too complicated.
1
2
3
4
5
6
7
8
9
10
11
12
13
14
15
16
17
18
19
20
21
22
23
24
25
26
27
28
#!/bin/bash

set -e -o pipefail

help() { ... }

logout() {
    check_credentials

    local oidc_config; oidc_config=$(get_oidc_config)
    local end_session_endpoint; end_session_endpoint=$(get_end_session_endpoint "$oidc_config")
    local id_token; id_token=$(get_id_token)

    end_session "$end_session_endpoint" "$id_token"
    rm -f "$HOME/.config/cdb/credentials.json"

    echo "Successfully logged out."
}


main() {
  case $1 in
    help | --help | -h) help;;
    *) logout "$1";;
  esac
}

main "$@"
Here, we check if the credentials are present. If they are, we request the OpenID Connect config endpoint once more to extract the end session endpoint. While we have it set, we retrieve the ID token originally returned from the token endpoint and stored in our home directory to call the end session endpoint with it. Finally, we remove the credentials file from the file system.
The helper functions for this part are written as follows:
1
2
3
4
5
6
7
8
9
10
11
12
13
14
15
16
17
18
19
20
21
22
23
check_credentials() {
  if [ ! -f "$HOME/.config/cdb/credentials.json" ]; then
    echo "No credentials found. Please authenticate first."
    exit 1
  fi
}

get_end_session_endpoint() {
  local oidc_config="$1"
  echo "$oidc_config" | jq -r '.end_session_endpoint'
}

get_id_token() {
  local credentials; credentials=$(cat "$HOME/.config/cdb/credentials.json")
  echo "${credentials}" | jq -r '.id_token'
}

end_session() {
  local end_session_endpoint="$1"
  local id_token_hint="$2"

  curl -s -o /dev/null -X POST "${end_session_endpoint}" -d "id_token_hint=${id_token_hint}"
}
Securing Curl Requests
The last part of our CLI journey will be to add a wrapper for the curl utility that will automatically add the access token to requests or automatically refresh the token if needed. The code for this part is presented below.
1
2
3
4
5
6
7
8
9
10
11
12
13
14
15
16
17
18
19
20
21
22
23
24
25
26
27
28
29
30
31
32
33
34
35
36
37
#!/bin/bash

set -e -o pipefail
source "$LIB_DIR/utils/oidc.sh"

main() {
  check_credentials

  local access_token; access_token=$(get_access_token)
  local token_type; token_type=$(get_token_type)
  local decoded_access_token; decoded_access_token=$(decode_access_token "$access_token")
  local access_token_expires_at; access_token_expires_at=$(get_access_token_expires_at "$decoded_access_token")
  local current_time; current_time=$(date +%s)

  if [ "${access_token_expires_at}" -lt "${current_time}" ]; then
    local refresh_token; refresh_token=$(get_refresh_token)
    local decoded_refresh_token; decoded_refresh_token=$(decode_refresh_token "$refresh_token")
    local refresh_token_expires_at; refresh_token_expires_at=$(get_refresh_token_expires_at "$decoded_refresh_token")

    if [ "${refresh_token_expires_at}" -lt "${current_time}" ]; then
      echo "Your session has expired. Please re-authenticate."
      exit 1
    fi

    local oidc_config; oidc_config=$(get_oidc_config)
    local token_endpoint; token_endpoint=$(get_token_endpoint "$oidc_config")

    refresh_access_token "$token_endpoint" "$refresh_token"

    access_token=$(get_access_token)
    token_type=$(get_token_type)
  fi

  curl "$@" -H "Authorization: ${token_type} ${access_token}"
}

main "$@"
Here, we check if the credentials are present in the same way as before logout. If they are, we retrieve the access token and its expiration date. If the token is already expired, we additionally retrieve the refresh token. If the token is not expired, we send a request to the token endpoint with it to obtain new credentials. Finally, we add an authorization header with the access token and any other arguments and options provided to the curl utility.
The helper functions used this time are as follows:
1
2
3
4
5
6
7
8
9
10
11
12
13
14
15
16
17
18
19
20
21
22
23
24
25
26
27
28
29
30
31
32
33
34
35
36
37
38
39
40
41
42
43
44
get_token_type() {
  local credentials; credentials=$(cat "$HOME/.config/cdb/credentials.json")
  echo "${credentials}" | jq -r '.token_type'
}

get_access_token() {
  local credentials; credentials=$(cat "$HOME/.config/cdb/credentials.json")
  echo "${credentials}" | jq -r '.access_token'
}

decode_access_token() {
  local access_token="$1"
  echo "${access_token}" | cut -d "." -f2 | sed 's/$/====/' | fold -w 4 | sed '$ d' | tr -d '\n' | openssl enc -base64 -d -A
}

get_access_token_expires_at() {
  local decoded_access_token="$1"
  echo "${decoded_access_token}" | jq -r '.exp'
}

get_refresh_token() {
  local credentials; credentials=$(cat "$HOME/.config/cdb/credentials.json")
  echo "${credentials}" | jq -r '.refresh_token'
}

decode_refresh_token() {
  local refresh_token="$1"
  echo "${refresh_token}" | cut -d "." -f2 | sed 's/$/====/' | fold -w 4 | sed '$ d' | tr -d '\n' | openssl enc -base64 -d -A
}

get_refresh_token_expires_at() {
  local decoded_refresh_token="$1"
  echo "${decoded_refresh_token}" | jq -r '.exp'
}

refresh_access_token() {
  local token_endpoint="$1"
  local refresh_token="$2"
  local client_id='couchdb-cli'
  local scope='openid+couchdb+profile+email'
  local credentials; credentials=$(curl -s -X POST "${token_endpoint}" -d "grant_type=refresh_token" -d "refresh_token=${refresh_token}" -d "client_id=${client_id}" -d "scope=${scope}")

  echo "${credentials}" > "${HOME}/.config/cdb/credentials.json"
}
Nothing very special. There are functions to extract and decode tokens from a JSON file, as well as a function to call the token endpoint with a refresh token. The new credentials are then stored in the same directory as before.
Adapting Lua Script for CLI Authentication
The very last thing we have to do before testing is a very small change in the Lua script we created in the first part of the series. If you remember correctly, we used the zmartzone/lua-resty-openidc library there to handle user session and authorization process if needed. However, in the current case, if the CLI client already has the access authorization header attached, we would rather avoid executing this code. To do this, we just check at the beginning of the script if the authorization header is present and execute the rest of the script only if it is not.
1
2
3
4
5
6
7
8
9
10
local authorization = ngx.var.http_authorization

if authorization ~= nil then
    return
end

local opts = { ... }
local res, err = require("resty.openidc").authenticate(opts)

-- Other lines ommited for clarity
Testing and Troubleshooting
Now for the fun part! We can add the path to our utility to the $PATH environment variable and check if our solution works as expected.
1
2
# .bashrc, .zshrc or other depending on which shell you use
export PATH=$PATH:~/couchdb-keycloak-sso/cli/bin
Let’s try to log in, make some requests to the CouchDB instance, and log out at the end. If you see outputs similar to the one presented below, it means that everything works fine.
1
2
3
4
5
6
7
8
9
10
11
12
13
14
15
16
17
18
19
$> cdb auth login
Open the following URL in your browser:

https://auth.oblivio.localhost/realms/master/protocol/openid-connect/auth?response_type=code&client_id=couchdb-cli&redirect_uri=http://localhost:8080&scope=openid+couchdb+profile+email&state=96QUFQhO510DVxkGw8O8A&code_challenge=toyFCZKAJbc5-9JbEkoePEVToA21rOJqVyONchNR3WQ&code_challenge_method=S256

Waiting for authorization...
Successfully authenticated as John Smith <john.smith@oblivio.localhost>.

$> cdb curl https://couchdb.oblivio.localhost/_session
{"ok":true,"userCtx":{"name":"671172b5-8297-434c-b4c9-8cfb7bd816f2","roles":["_admin"]},"info":{"authentication_handlers":["proxy","jwt","cookie","default"],"authenticated":"jwt"}}

$> cdb curl https://couchdb.oblivio.localhost/_users
{"instance_start_time":"1715959654","db_name":"_users","purge_seq":"0-g1AAAABXeJzLYWBgYMpgTmEQTM4vTc5ISXIwNDLXMwBCwxyQVB4LkGRoAFL_gSArkQGP2kSGpHqIoiwAtOgYRA","update_seq":"1-g1AAAACbeJzLYWBgYMpgTmEQTM4vTc5ISXIwNDLXMwBCwxyQVB4LkGRoAFL_gSArgzmRIRcowG5pmmJubG6BTR8e0xIZkuqhxjCCjUlMNjcxtzDBpiELANAkKAQ","sizes":{"file":20834,"external":5397,"active":2351},"props":{},"doc_del_count":0,"doc_count":1,"disk_format_version":8,"compact_running":false,"cluster":{"q":2,"n":1,"w":1,"r":1}}

$> cdb auth logout
Successfully logged out.

$> cdb curl https://couchdb.oblivio.localhost/_session
No credentials found. Please authenticate first.
Summary
Perfect! We’ve just achieved what we planned for this part. Now we can access our CouchDB instance within the browser and CLI seamlessly. Although there is still some room for improvement with the current solution — such as error handling — we will stick to it as is for now. In the last part of the series, we will put some effort into ensuring that CouchApps can also work fine with our current authorization solutions.
If you need all the code from this article in one place, you can find it in my GitHub repository.
At this point, thank you for reading this article. I would love to hear your thoughts about this solution. Whether you work actively with CouchDB or Keycloak, can you spot weaknesses in this solution? Or maybe you would improve something? I would love to hear about it in the comments.
Don’t forget to check out my other articles for more tips and insights and other parts of this series when they are created. Happy hacking!